If you’re looking for a faster, more efficient way to update your Woodstock model, Integrator is powerful functionality within the Woodstock Optimization Studio that can help you do that. Providing two-way connectivity between your data and model, Integrator makes it easier to make model updates and reduces the risk of costly errors.
To access Integrator, you’ll need the latest version of the Woodstock modeling platform and a Remsoft maintenance agreement.
In this post, we’ll walk through the key steps required to make updates to your model using Integrator. If you are interested in building a new model with Integrator, we suggest you join one of our Automated Model Building training courses to learn more about incorporating Integrator into your workflows, review best practices and common data approaches for organizing your work and streamline your modeling process.
Here are six steps to get you started with Integrator.
-
Define the model update scope.
The first step is to decide which part of the model you want to update. Sections that use a high volume of input data usually have the greatest potential for integration. So, it’s best to target the sections that require frequent updates, such as Landscape, Areas, Yields, Optimize and Allocation.
-
Structure the input data.
Integrator queries tables of data and returns model formulations. As a result, it’s critical to have structured and clean data when using Integrator. Data can come from multiple sources, and you can store your standardized data in the following formats: DBF, MDB, CSV, ACCDB, XLSX, SQLite, SQL Express, and Microsoft SQL Server.
Poorly structured or non-standardized data will cause model update issues. We recommend that your flat table files have short, character-based column headers in the first row of the tables with no spaces or empty cells. Database tables should be normalized and follow best practices. This allows data to be queried and manipulated. Most Integrator generated errors stem from data issues, so this is where you will need to spend the most time during the upgrade.

-
Connect to a data set.
Integrator functionality connects to data in tabular format, in flat input files or database tables. To connect Woodstock to a SQL database, you will require an ADO file, which connects Integrator to a SQL server. The ADO file contains text and credentials necessary to connect a model to a server and database. The ADO file must be stored in the model folder and have an ADO extension. To create it, simply open a text/Notebook file and save it as db.ado. This step is required if you are using SQL Express or Microsoft SQL Server. However, you can skip it if you are using flat table files.
After you create the connection file, you have to insert the required information in the correct format. To learn more about the content and structure of the ADO file, please read article 1443 in the Woodstock Integrator Help. -
Create a Woodstock template.
Once Woodstock is connected to your structured data, you are ready to create queries that manipulate data into model syntax using a template file. It’s essentially an additional Woodstock model section that contains instructions on how to populate one or many sections or parts of the model.
You’ll know the template file was created and named properly when the Integrator icon appears in the Editor toolbar.
To learn more about this Woodstock feature, you can read article 1440 in the Help section.
-
Build the integration logic.
When Integrator is prompted to update a model or model section, it reads the code and queries included in the template, resolves the queries, and then copies the results into the appropriate model section. As a result, each line of code inserted into the template must result in valid Woodstock syntax.To upgrade an existing model with Integrator, there are two ways to build the integration logic. The first one involves rebuilding the section logic directly into the template. The second one consists of first copying the content of the existing section into the template and then replacing the queries. We recommend building a section integration script from scratch for sections that are 100% made of imported data, such as the Areas section.
The template file is divided into each section of the model using section keyword identifiers. These are the same section keywords you see on the Primary file that use capitalize letters and appear in bold dark blue font. The order you insert the sections in is not important; however, the order of the code within a template section must respect the same rules as the sections themselves.
Three ways to populate the template section:
- Hard-coding syntax and content
Using this method to update your model, existing content will be written exactly as it is directly into the Woodstock section. - Content created via list iterations (FOREACH loops)
This content can use regions and comments, but it also takes advantage of the looping syntax from locally declared lists. Basic iteration loops are those where the user provides a list to iterate through, such as number intervals or months of the year. They can also use one of the Woodstock lists like _ACTION or _DESTINATION. You can learn more about the FOREACH loop structure in article 1444 of the Help section. -
Content created via database queries (FOREACH loops pointed to data files and databases)
This is the most useful method to create content. It uses the queries to a data file or database. You can read more about the use of loops through databases in article 1445 in the Help section.
- Hard-coding syntax and content
-
Update the model.
Before you update a model section, we recommend validating the results of the FOREACH queries manually to prevent any issues. You can do this by double-clicking on all the FOREACH keywords you have used in a section of the template and by inspecting the resulting syntax in the text window that opens. If the results are not what you expect, you can address the issue in the template before updating the model.
Before updating, you may further refine the scope of the updated content by selecting specific section formulations, called Integrator regions (see article 3053 in the Help section).
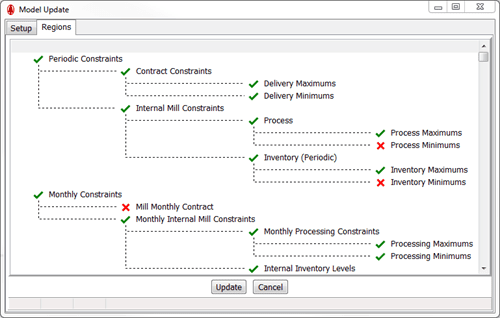
When you have created the logic of a section in the template, you can use the Update Model functionality by clicking on the gear icon in the Editor toolbar. Select one or more sections to be updated, then click Update. You can read article 1759 in the Help section to learn more about this functionality.
Now, you’re ready to update your model.
As you can see, Integrator is very powerful feature that can save you a lot of time and prevent problems. In fact, some analysts say they’d never build a Woodstock model without it.
LEARN MORE:
-
You can find out more about its full functionality in the Help section. In the Table of Contents on the left, click Woodstock then Integrator functionality.
-
Register for an online Automated Model Building training course, to learn more about how you can utilize the Integrator feature to improve modeling efficiency.